The quality of our audio can significantly affect a viewer's experience of the video. It's understandable how creating quality audio can be neglected when we're focused on the visual, but the quality of our visual work can get lost when the audio isn't handled effectively.
Like a favorite wine and dessert pairing, a good video pairs hand in hand with the video’s audio and each enhances the other. We want to make sure we show at least as much concern for the quality of our audio as we do our video to provide the best version of our projects that we can.
Here are seven tips to help you improve your audio when you're working in DaVinci Resolve.
- Normalize Audio Levels: the most common way of making sure that audio is at a standard, intelligible level. Right-click on an audio clip under the "Edit" tab and click the “normalize audio” option. Then adjust to the desired dBSF.
Unsure what you’d want your dBSF to be? Here’s a scale for good audio quality based on type of tone, provided by Streamershaven:
Aim for decibel (dB) levels between -10 to -15. This is for a normal, conversational, speaking voice. Use this as a reference. Often -12dB is used as a standard by many videographers. Just remember you’re not aiming for it to be constantly at one level, a range is important for the best and most natural listening experience.
- If you are trying to emphasize something being said or give a voice a stronger presence in the mix, lean more towards -10dB.
- If the speaker is supposed to be more soft spoken, stay closer to -15dB.
- You can go beyond that range for particular circumstances.
- If someone is whispering bring the volume down to -20dB.
- If someone is shouting you could bring the volume up as high as -3dB, though -6dB is usually sufficient.
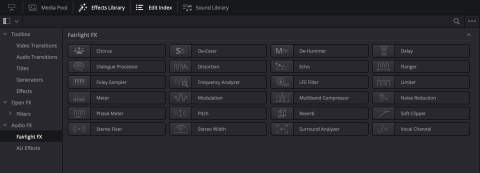
- Reduce the Noise: one of the the easiest ways to tighten audio. This tool removes any excess background noise by tracking the audio peaks and eliminating the noise. Open up the toolbox on the top left of the edit tab, head over to Fairlight FX and select the “Noise Reduction” option.
From there you can adjust the noise reduction’s attack, sensitivity and threshold:
- Attack controls how quickly the noise reduction activates.
- Sensitivity controls when the noise reduction activates based on the noise detected.
- Threshold controls how the noise reduction differentiates between the audio you want to keep and the noise you want to reduce. The default settings usually go a long way, but better results come with minor adjustments. Always be careful with noise reduction, because if pushed too far, we may get some unpleasant results.
-
- Adjust the Voice Channel: the same process as the Noise Reduction tool. Heading over to Effects Library’s toolbox and clicking the toggle on (red highlight) A pop-up will appear that allows us to adjust our audio’s compression, frequency, and gains. We can save our adjustments as presets so we can reuse them in the future, as well!
- Use The Limiter: another neat tool to help us lower our high peaks to a more natural level. We would do this, similar to the two processes above. We go into our Fairlight tab, click on our audio, and then open the Mixing table at the top right. Once open, we can click on Effects > Dynamics > Fairlight FX > Limiter. This will open up a pop up that allows us to change the release and level thresholds to balance out our sound.
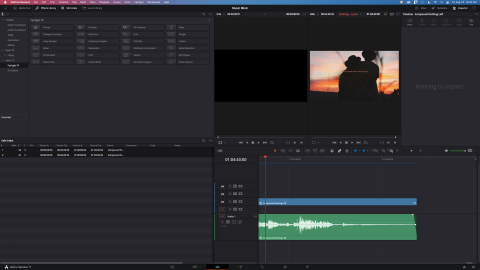
- Don’t forget about Fade In/Outs: Sometimes, we want to place some of our audio clips on top of one another for effect, or make sure that the intros aren’t too loud, and things are coming in at the exact times we want our audience to hear them. For these moments, we utilize fades. The fades can be maneuvered super easily, by finding the grey tab at the top left (start) and right (end) and dragging them in more towards the center. You’ll see the line of the audio’s gain start to curve, as the fadeout is applied.
- Pay attention to Audio Keyframing:
Keyframes are all about making change over time. Keyframes are used in a variety of circumstances including visual effects and animation. Basically, a keyframe identifies the settings for a particular attribute at a particular point in time. When we have two keyframes that identify different settings at different points in time our editing software will use those keyframes as reference points for the start and end of a change in that attribute over the time between the keyframes.
When working with audio the attribute we’re usually keyframing is volume. So, if we put a keyframe for volume at the one minute mark that sets the volume to -6dB and another keyframe for volume at the two minute mark that sets the volume to -12dB, our editing software will reduce the volume from -6dB to -12dB between minute one and minute two. At the one minute and thirty second mark, for example the change will be halfway complete and the volume will be at -9dB.
We can add keyframes to our audio by hovering our mouse over the gain line, and clicking on our desired keyframe location while holding down the ALT key (for PC, Option key for Mac). We can add as many key frames to our audio as we’d like, and can open up the Inspector to play around with each keyframe’s attributes, adjusting which sounds come through when.
- Sync audio from multiple sources: often a necessity when we are working on big productions with multiple sources of audio. Usually, we’ll have the camera audio, audio from a boom mic, and audio from one or more lav mics. Now, let's say we like the audio from our lav mic most and want to replace the camera audio with it, but we started recording on the lav and boom mics at a separate time from the camera and we’re not sure when the audio is actually the same. What we’d do in this situation is drag all of the audio clips we’re using onto the timeline we’re working on and highlight them all together. Then we would right-click and choose “auto align clips” > “based on waveform” and Resolve will snap all the audio clips into place so their audio matches, providing us with the opportunity to change between our different sources and hear the same moment as it was recorded by the different microphones. We want to make sure it aligns so we can make sure people’s mouths are moving simultaneously with the sound or we’re not hearing any echo because one of the clips is slightly behind the others.
One of the greatest things that we can do for our videos as editors is make sure the audio is clean, clear, and easy to understand. Try out one or more of these tips and techniques and how they affect your audio environment. Learning to use these tools can help raise the level of your production and make for a much more professional-sounding project.
To learn more about MNN and the Media Education Bootcamps, Professional Courses and Workshops we provide, visit us at: www.mnn.org/learn
Want more? Click here for our in-person classes!