Establishing a streamlined podcast editing workflow lets you focus on the creative parts of podcasting without being tied up in post-production details.
A clear editing plan also helps avoid costly miscommunications if you're working with a team, and can help save you time, money, and headaches all the way through the podcasting post-production process. Luckily, creating a logical editing workflow is easy to do.
Here's our editing workflow guide to help set you up for podcast success from the start.
- Organize your audio: Establish a clear labeling system and folder structure for all your assets. Create an overarching folder to store all of your podcast projects and episodes. Within that folder, create an additional folder for each new episode, labeled with episode number and date. Ceate a series of subfolders (see the screenshot below) to store your audio files. Include subfolders for Project Files, Interviews, Voiceovers, Music, SFX, Field Recordings, Podcast Final Exports, and any other necessary categories. Make sure that your audio files are clearly labeled and organized.
Use the same labeling system and structure for every episode so that you and your collaborators can easily find your materials.
- Organize your audio by track: Once you have organized your audio clips, it is time to set up your editing timeline. After opening up your audio editing software of choice, whether it is Adobe Audition, or a free software such as Audacity, import your audio and create separate tracks for different audio elements.
Create a separate dialogue track for each speaker, and if needed, a voiceover track as well. Make sure to double check that all of your corresponding dialogue tracks are synced before editing to avoid headaches later. Create additional tracks that are needed for SFX and Soundtrack audio. Separating your audio by tracks helps ensure that you won't accidentally implement changes to the wrong element.
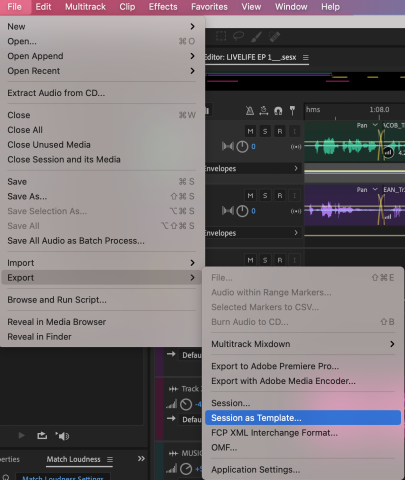
- Create a template (if you want to): Some editing applications enable you to create a template that you can return to every time you edit a new episode. This approach works well if all your projects or episodes follow a similar format. You can cut down on time spent organizing your project file by creating a template loaded with the number of necessary audio tracks, intro and outro music, and corresponding effects that you use every time.
- Edit your audio: After making sure that your dialogue tracks are synced, begin editing your audio for story and/or a target length/duration. Depending on the format and desired length of your podcast, you might be editing to build a narrative and/or to fit duration parameters, or you might be following a written script that you have created ahead of time.
If your budget and/or time permits, creating a transcript of your dialogue audio can help edit more efficiently. It is now becoming increasingly common for editing software to include a transcription function directly in the program. Editing software such as Descript will create transcriptions of the audio that you can import into your editing application.
- Clean up and create a final edit: After creating the fine cut of your edit, tighten it up by deleting extra audio and any mistakes. You may choose to delete unwanted and distracting “Uhs” and “Ums” or any dead air as needed. Make any last changes to your edit until you are happy with the final product.
- Mix audio: After your final edit is solidified and locked, mix and adjust the audio levels so that each track can be heard clearly and that the Dialogue is not competing with sound effects or the soundtrack to be heard. Add commonly used effects including equalization and compression to sweeten the dialogue and other audio tracks as needed.
- Master audio: "Mastering" involves adjusting the overall sound and audio level of your podcast after you have mixed it. Some editors will export the podcast to a single track after mixing so that they can easily master one track containing all of their podcast elements. Add compression, a limiter and and loudness settings as needed to complete your project.
- Export and upload: The final step is to export your episode so you can upload it to your podcast hosting site and share it with your audience. Then create copies and rename them to follow any naming conventions your hosting/distributor may require. For more information on distribution, check out our 5 Best Ways to Distribute Your Podcast for further info.
Well done! You have completed your podcast!
It is important to note that this is just an overview of the post-production podcast. It is always important to thoroughly research the methods discussed that best align with your editing needs when preparing to release a podcast.
For more information, tips and tricks visit www.mnn.org/learn for free workshops, professional courses, filmmaking bootcamps, and more resources to make your productions successful.