
By Nicole W. Solomon
Got a great idea for a film or video but unsure how to put your best foot forward in terms of framing? In this era of flashy cameras and tech wizardry, the good ol' art of composition sometimes takes a back seat, even though it's one of those secret spices that make cinematography truly pop. Let's dive into three tried-and-true tips that will help you make the most of each frame.
Find your angle
You can always shoot your subjects so the camera is at eye level, which tends to convey a neutral perspective, but there might be a more interesting option that will better help tell your story. Shoulder-level shots, in which the camera is the height of the subject’s shoulders, are actually more common in film than eye level, and help to create a more cinematic look. If you want a character to look intimidated--or intimidating--you can try shooting them from a high or low angle. Aiming the lens up towards a character can make them appear powerful, whereas shooting from above forces the audience to literally look down on them for a more vulnerable feel. Placing the camera at hip, knee, or even floor level can create a memorable effect and emphasize different elements of the scene. And finally, a good old-fashioned Dutch angle (also known as a “Dutch tilt”), in which the camera is slanted so your subject appears diagonally in frame, can add instant interest to your composition, enhancing tension or creating disorientation.
Our friends at Studio Binder have a great visual guide to camera angles: https://www.studiobinder.com/blog/types-of-camera-shot-angles-in-film/
Consider your theme
What is your project about, and how are you planning to convey that visually? You want to develop a visual style that helps communicate the themes of your piece. If you are exploring isolation, consider sparse frames that visually reflect that concept. Similarly, an intentionally cluttered shot can speak to the preoccupied state of a character’s mind. Where you place people or objects in the frame, and in relation to one another, can speak volumes beyond what dialogue can do. Carefully placed props or pops of color can bring more meaning into your mise en scene. Remember to really look at that rectangle on your monitor and consider how a little re-arranging or additional set decoration could level up your composition and better express what your project is all about.
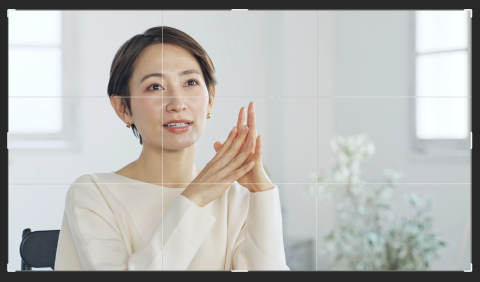
Remember the Rule of thirds
The rule of thirds endures for a reason! Create balance and harmony by simply dividing your frame into thirds, both horizontally and vertically, using two horizontal and two vertical lines, creating a grid of nine boxes. Then, place your main point of focus, wherever you most want a viewer’s eye to go -- perhaps an actor’s face, or an important object -- on one of the four line intersections. This kind of off-center framing creates a more “natural” looking image that most people respond to positively, and can instantly make an amateurish composition look more professional.
Whatever your approach, remember that the frame is yours to use to tell your story. Make sure that little rectangle says what you want it to!
Nicole W. Solomon is a Brooklyn-based filmmaker and media educator. She is half of the independent production company 4Milecircus and co-hosts the film discussion podcast The Celluloid Mirror.
There are so many options for how to export your video once post-production is complete. Which file format is best? The answer is, it depends...read on!
Learn all about b-roll and how you can find it, shoot it, and use it to add depth and interest to both scripted and documentary video projects.
Need to achieve professional, cinematic lighting on a limited budget? Read on for some essential techniques that will enhance production values without breaking the bank.